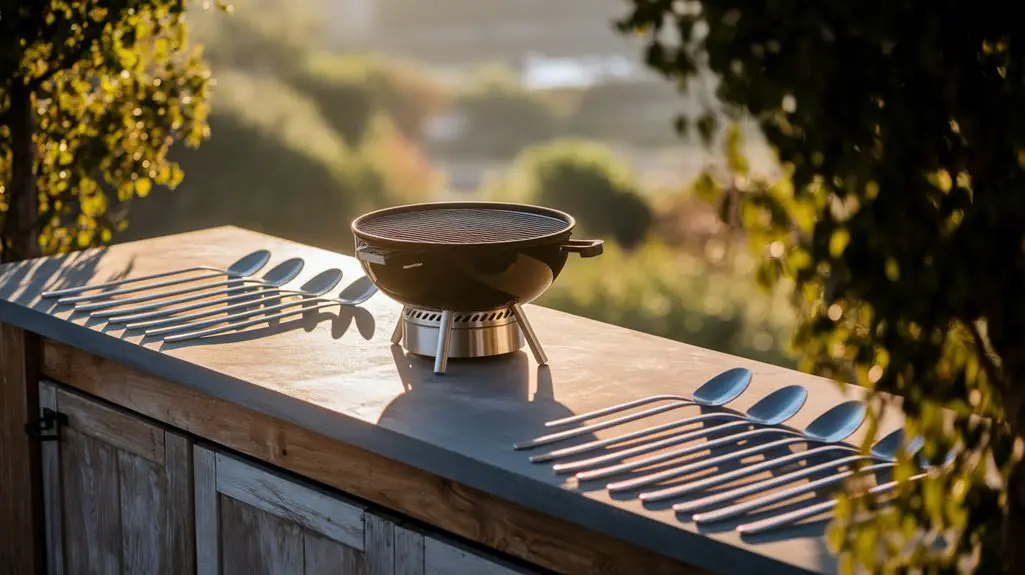
When your wallet feels a bit light but your outdoor cooking aspirations remain sky-high, DIY BBQ setups can be your saving grace. You’ll find that creating your own grill station doesn’t require professional expertise or expensive materials. With simple tools and creative thinking, you can build a functional outdoor kitchen that elevates both your cooking capabilities and entertainment space. The secret lies in knowing which affordable materials offer the best combination of durability and heat resistance—and that’s just the beginning.
Essential Materials for Building Your DIY Grill Station
Crafting a successful DIY BBQ grill station begins with gathering the right materials.
You’ll need a heat-resistant foundation like concrete pavers, brick, or natural stone for the base. For the structure, consider pressure-treated lumber, cinder blocks, or steel framing that can withstand outdoor conditions.
Don’t overlook quality fasteners—stainless steel screws and brackets resist corrosion and guarantee longevity. Your countertop should be durable and non-combustible; granite, concrete, or tile work well.
For storage components, weather-resistant cabinets or shelving units are essential.
Purchase high-temperature silicone for sealing joints near heat sources. Finally, include appropriate ventilation materials if you’re building an enclosed structure.
Incorporating stylish outdoor kitchen designs can enhance not only functionality but also the aesthetic appeal of your space.
Measuring tools, a level, and safety equipment like gloves and protective eyewear complete your material list.
Budget-Friendly Cinder Block Grill Design
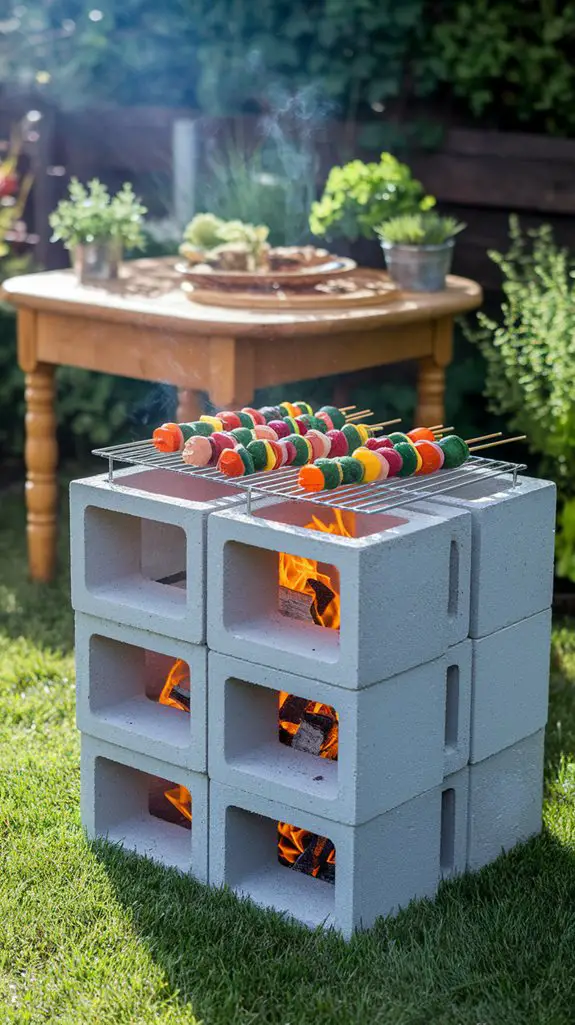
When looking for an economical yet sturdy BBQ solution, a cinder block grill design stands out as one of the most accessible DIY projects.
You’ll need about 20-24 standard cinder blocks, a metal grate, and a flat surface to build on.
Begin by laying out a U-shaped formation with your blocks. Place the first layer in the desired pattern, ensuring corners are square and the structure is level.
Add a second layer, staggering the blocks like brickwork for stability. Insert additional blocks to create different cooking height options.
For the cooking surface, rest your metal grate across the top of the structure. You can adjust its height by adding or removing blocks.
This simple design allows for direct grilling or indirect cooking when you position coals strategically. Additionally, this type of grill setup can enhance family gatherings by providing a communal cooking experience.
Repurposed Materials for Rustic Grill Setups
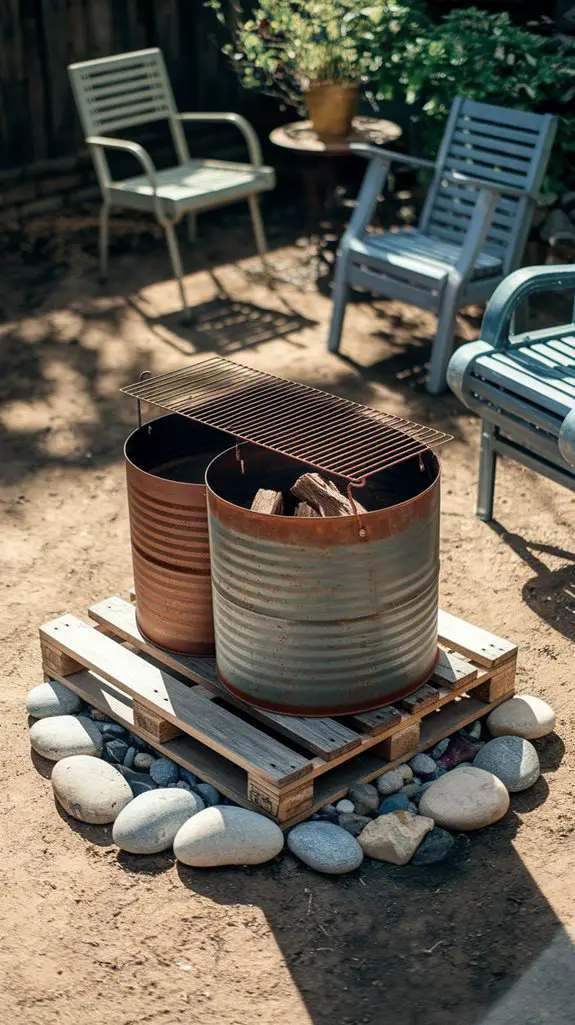
Three common household items can be transformed into exceptional grilling stations with minimal investment.
Old metal washing machine drums create perfect fire pits with built-in ventilation—just add a cooking grate on top. Remove the drum’s central agitator and flip it upside down for stability.
Steel wheelbarrows offer portable grilling solutions. Clean thoroughly, drill drainage holes, add charcoal, and top with a reclaimed oven rack. The handle provides convenient mobility for repositioning during cookouts.
For larger gatherings, convert an old filing cabinet by removing drawers, laying it horizontally, and installing grates at different heights. This design creates multiple cooking zones with varying temperatures. Apply high-heat resistant paint to the exterior for weather protection and aesthetic appeal.
In addition to these creative setups, consider incorporating functional outdoor kitchen designs that maximize your grilling experience and enhance the overall ambiance of your space.
Space-Saving BBQ Solutions for Small Patios
Limited outdoor space doesn’t mean you should sacrifice your grilling aspirations. Wall-mounted grills provide excellent functionality without consuming precious floor space—simply fold them down when needed and up when not in use.
Consider tabletop grills that can rest on existing furniture or custom-built shelving that integrates your cooking station into balcony railings or patio walls.
Compact vertical smokers occupy minimal square footage while maximizing cooking capacity. Look for multi-functional units featuring both grilling and storage components.
Caster-mounted setups allow you to roll your grill into a corner when not in operation. Magnetic tool strips attached to nearby walls keep utensils organized without requiring additional surface area.
When designing your space-saving BBQ station, prioritize heat-resistant surfaces and adequate ventilation to guarantee safety in confined areas. Incorporating perfect BBQ grill ideas can elevate your outdoor movie nights while ensuring functionality.
Building a Weather-Resistant Grill Island
Creating a durable outdoor grill island requires careful material selection to withstand years of weather exposure. Choose weather-resistant materials like concrete blocks, stone veneer, or marine-grade plywood treated with waterproof sealant. Install proper drainage channels to prevent water accumulation around your grill components. Additionally, consider incorporating shade and shelter ideas to enhance your grilling experience and protect your setup from the elements.
| Material | Weather Resistance | Approximate Cost |
|---|---|---|
| Concrete Blocks | Excellent | $2-5 per block |
| Stone Veneer | Very Good | $7-15 per sq. ft |
| Brick | Excellent | $0.50-1 per brick |
| Stainless Steel | Good | $20-40 per sq. ft |
| Composite Decking | Very Good | $30-45 per sq. ft |
Add a sloped countertop (1-2° pitch) to shed water efficiently. Incorporate removable panels for maintenance access and ventilation gaps to prevent moisture buildup. Apply UV-resistant sealants annually to extend your island’s lifespan in harsh conditions.
Incorporating Storage in Your DIY Grill Station
Smart storage design transforms a basic DIY grill station into a fully functional outdoor kitchen where everything you need stays within arm’s reach.
When planning your storage, prioritize weather-resistant materials like marine-grade plywood or stainless steel cabinets that withstand moisture and temperature fluctuations.
Incorporate dedicated spaces for grilling essentials: utensil hooks beneath countertops, pull-out drawers for spatulas and tongs, and specialized compartments for wood chips and charcoal.
Consider installing magnetic strips for metal tools and deep drawers for bulkier items like cutting boards.
For safety, add sealed containers for trash and recycling, plus a designated cabinet for cleaning supplies.
Don’t forget to include proper ventilation in enclosed storage areas to prevent moisture buildup. Additionally, integrating inviting bar spaces can enhance the overall experience of your outdoor kitchen.
These strategic storage solutions will keep your outdoor cooking space organized and efficient year-round.
Adding Functional Countertop Space to Your Setup
Sufficient countertop space serves as the backbone of any functional DIY BBQ station, providing essential work areas for food prep, plating, and temporary tool placement.
When designing your setup, prioritize durable, heat-resistant materials like concrete, granite, or marine-grade plywood sealed with food-safe polyurethane. For maximum functionality, consider: – Creating different height surfaces – 36″ for prep work and 42″ for serving/bar areas – Installing at least 24″ of space on either side of your grill for safe food handling – Incorporating a slight countertop overhang (1-2″) to mount utensil hooks underneath.
Plan for approximately 16 square feet of usable countertop area minimum for a basic setup. This guarantees you’ll have room for essential tasks without feeling cramped while managing multiple dishes during your cookouts. Additionally, including built-in seating options can enhance your outdoor cooking experience by providing a comfortable area for guests to relax while you grill.
DIY Fuel-Efficient Smoker Box Additions
While standard grills provide direct heat for cooking, you’ll elevate your BBQ game considerably by adding a DIY smoker box to infuse rich, wood-smoked flavors into your meats and vegetables.
Create an efficient smoker box using a metal container with ventilation holes drilled in the lid—a repurposed steel ammunition box or toolbox works perfectly.
Line the bottom with aluminum foil before adding your wood chips to maximize efficiency and prevent rapid burning. For consistent smoke, soak your chips in water for 30 minutes before use.
Position your DIY smoker box near but not directly over heat sources to maintain a steady 225-250°F smoking temperature.
Install a simple baffle system using sheet metal to direct smoke flow evenly around your food, ensuring complete flavor penetration while reducing fuel consumption by up to 30%. Unique BBQ grill setups can enhance your outdoor cooking experience, making gatherings more enjoyable and flavorful.
Conclusion
You’ll find that building your own DIY BBQ setup isn’t as complicated as it might seem. With basic materials and a weekend of work, you’ll create a customized grilling station that perfectly fits your space and cooking style. While weather exposure concerns are valid, incorporating proper drainage, weather-resistant materials, and a fitted cover will guarantee your creation lasts for years of outdoor entertaining and family meals.


