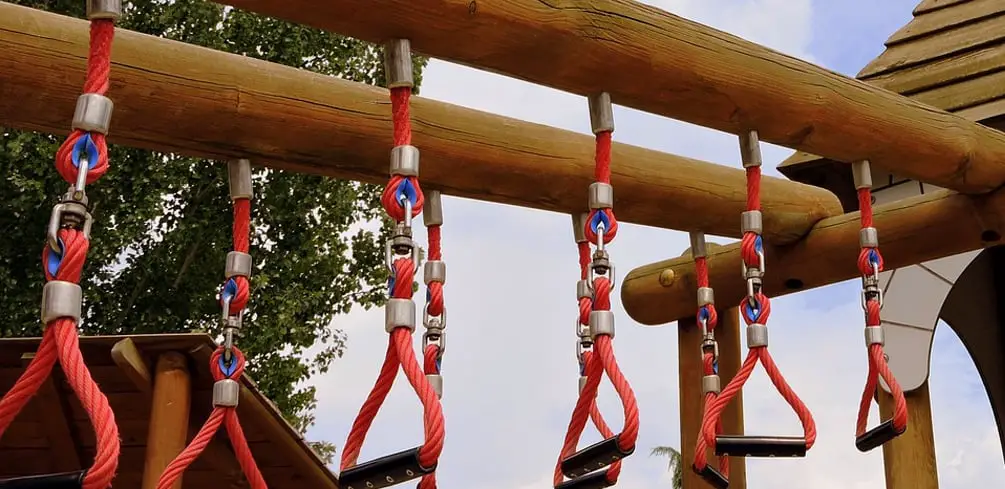
Here are the simple steps for installing monkey bars to playsets.
- Prepare the location
- Install posts
- Add climbing steps
- Install the monkey bars
- Test the monkey bars
You can preorder a monkey set kit and use it to add monkey bars to your child’s playset. It saves the time necessary for gathering the materials needed.
Monkey bars are an excellent way to instill confidence in a child and help them build their upper body strength. They are an amazing addition to a fort or a playhouse for kids of different ages.
It would be best if you had planks for the ladder and monkey bars for the addition.
The most important part is the support posts that will hold the monkey bars and offer attachment to the existing playset. You can opt to preorder a monkey set kit and use it to add monkey bars to your child’s playset.
Parents can add monkey bars to an existing playset as a DIY project to increase the activities that kids can do outdoor.
What Do You Need?
It would be best if you had a few supplies to install monkey bars for a playset successfully. Here are the supplies you need to collect for a DIY monkey bars installation project.
- Four 4”x 4” posts for support.
- Planks that are 2” x 4” for the steps of the ladder.
- ½ inch or more Nails.
- Quick-dry concrete.
- Gravel.
- Monkey bar kit.
You will need a saw to cut the wood to size and a drill for installing the nails and bolts. It would also be best if you had tools to dig a hole in the ground for posts.
Take time to select a flat surface that will be the installation area when you add monkey bars.
Parents may have to flatten the area of installation to ensure that the monkey bars will be stable. Additionally, set aside adequate time for the installations, preferably on the weekend.
How to Add Monkey Bar Kit to a Playset?
Several activities are necessary for the successful addition of monkey bars to a playset. It will go faster when two or more parents do the project because several pieces need to be put together that use heavy materials.
Ground Preparation
Ground preparation is an essential step that ensures that the monkey bars’ location is even and well-drained. When you add monkey bars to an existing set, you still need to ensure that the area is safe for kids and sturdy.
Keep in mind that your child will spend many hours at the monkey bar, and they will need a soft area for landing when they do fall. Extend the border of the playset to keep any shock-absorbing materials under the monkey bars.
Post Installations
Once you have even ground, you can dig the holes for the monkey bars’ supporting posts. You will need to place two posts next to the existing play set to support beams that connect the addition.
Depending on the monkey bar kit’s recommended distance, parents need to install the other two posts opposite the original two.
Some kits require a distance of 2ft, 4ft, or 6ft, depending on the monkey bars’ age limit. Dig holes that are about half a foot deep for the posts to go into.
Put some gravel into the hole to provide a firm base when adding the post. Prepare some quick-dry concrete and start installing the posts.
Place one post in their hole and then pour some quick-dry concrete until you fill in the space remaining in the hole. Take a few minutes to straighten the pole before the quick-dry concrete sets.
Repeat the process to the remaining three posts. Let the posts sit for at least four hours before continuing with the process of building monkey bars.
Add Steps
Installing the steps should be the task once the concrete sets and the posts are stable. Select the posts furthest from the playset to install climbing steps using 2” x 4” wood planks cut to size.
Ideally, you will have two poles next to a playset about two feet apart and another pair of corresponding posts about six feet away from the playset.
The distance of the steps will depend on the age of the child using the monkey bars. You can choose to place the steps about a foot apart to ensure that most children can climb them.
Measure the first step from the ground up to ensure the steps are evenly spaced.
Install the Monkey Bars
To install monkey bars, you will have to add two beams from the steps to the playset. The beams will hold the monkey bars and create a safe area for kids to suspend themselves.
Use heavy-duty nails to install the beam because they will be supporting the weight of a child. You can use 4″ x 4″ beams, which are sturdy.
Follow the installation instructions of the monkey bar kit and space them as per the manufacturer’s recommendations. Ensure that all the bolts for the monkey bars are tightened to keep them in place all the time.
Test It
Once you add monkey bars to a playset, you need to test the monkey bars’ capacity. You can request one of your children to get onto the monkey bars and see whether it is wobbly.
Please have a few kids get on it simultaneously and gauge how well the set holds up. Make sure to also clean the monkey bars before use.
Can You Paint the Addition?
Yes. Most monkey bars come with a bright color that is attractive to kids, but you can always paint the posts with some fun colors. Choose paint that is kid-friendly and eco-friendly.
Choose colors like blue, red, green, yellow, pink, or other bright colors that kids will find appealing. Try to add colors that match your current playset’s colors to avoid making the monkey bars look out of place.
What Do You Put Under Monkey Bars?
It is imperative to have shock-absorbing materials under monkey bars to break the fall when a child falls. You can opt for wood mulch, rubber mulch, sand, or pour in place rubber.
It will take a while for kids to get used to getting across the monkey without falling.
Although the bars shouldn’t be more than one foot higher than a child’s height, it won’t hurt to prepare the ground for a slip. At times some people will add a climbing cargo net to the side that way if the child falls they can grab a hold of the net to fix their balance.
How far apart are the Bars on Monkey Bars?
The spacing of bars on a monkey bar should depend on the beams’ distance that you are setting the bars upon. For example, if you have 11 bars and the beams are 110 inches long, divide the beams’ distance by the number of bars.
In the example above, your bars will be 10 inches apart. Ideally, do not space the bars more than 12″ apart for easy to use by kids of various ages.
How Do You Make Monkey Bars Safer?
Making monkey bars safer is an essential factor that all parents should consider after the installation. Children will slip and fall off the bars when they are smooth without any anti-slip material to ensure that kids have enough grip when playing.
You can opt to add rubber slip-resistant covers to ensure that kids can move seamlessly on monkey bars. Alternatively, you can buy sports gloves that your child can use whenever they want to play on the monkey bars.
Conclusion
It is possible to add monkey bars to a playset as a DIY project. It is a good idea to ask a friend to help out making monkey bars for your child’s playset.
It would be best to download some specs for monkey bars that are age-appropriate for your little one.
You will need to measure out the height of the support posts so that they are about one foot longer than your little one’s height. The idea is to keep the distance of their fall short to reduce the possibility of injuries.
Overall, you can add monkey bars to your child’s set to add an extra fun activity.
Please be careful and use at your own risk
None of the authors, contributors, administrators, or anyone else connected with BestPlaygroundSets, in any way whatsoever, can be responsible for your use of the information contained in or linked from these web pages.


