To create a ring toss game you will need to cut the plywood, glue it, paint pegs and prepare handles for carrying the box. Next, paint it or use a graphic then follow up with adding rails. Don’t forget to purchase or create the rings. More detailed steps are below.
Do you remember the carnival fairs at school when you were a kid? Or are you searching for a fun yet simple party game that you can play at the birthday bash for your kid?
Then you should consider the classic ring toss carnival game. You could play the game at a birthday party or for fun at home.
The game can be played by people of any age, old or young. Its rules are easy enough for any guest’s age to play and can also be adapted for a version suitable for your party’s theme.
What Is A Ring Toss Game?
A ring toss carnival game refers to a game in which rings are usually tossed around a vertically standing peg. There is a ring-a-bottle variant where the pegs are replaced with bottles.
The ring thrower may keep the bottle’s contents if they succeed in tossing the ring around it. This is also a game for children and toddlers because it can assist in developing the child’s hand-eye coordination and motor skills development.
The ring toss carnival game is challenging both mentally and physically. The game requires body control and concentration to assess or measure the distance and then toss the rings with high precision to encircle the peg.
The game also encourages cooperative play and focus. There are various types of this game, but they all follow the same principle.
What Are The Rings Made From?
As noted above, the game involves throwing rings around a peg. But what are the rings made from?
The rings used in this game can be made from plastic, ceramics, metals, or even wires. However, the material used determines the ring’s durability, meaning that wire or metallic rings will last longer compared to ceramics.
The material used in making the rings also informs the safety. Do not use rigid metals to make the rings as they might injure the toddler or child.
Plastics or wire rings are better preferred because they are light and durable. Some parents also custom embroidery to make the rings more attractive to their kids.
This also helps match the rings with the party’s theme through colors, for instance, purple or red for valentine’s day. Further, the rings might be round, rectangular, or heart-shaped, depending on your preferences.
The Pegs for Ring Toss
These are the vertically standing objects where the ring will encircle. These can be anything from beverage bottles, sticks, metals, you name it.
They also can be customized to fit the theme of the carnival party. They can have equal or different lengths based on the game you are playing.
The Ring Toss game can be as simple as sticking some sticks down the ground and throwing the rings around the sticks or metal and throwing the rings around it to build an appealing structure that has a place for storing the pegs and the rings.
Some ring toss carnival games are even sold online, making them among the most popular games. You could turn to DIY and create one for your child for various reasons, such as enthusiasm or lack of money to purchase one.
The section below will discuss how to make a classy but Attractive, simple DIY ring toss carnival game.
How to make DIY Ring Toss Carnival Game
By making the ring toss game yourself, you can be as creative as you want or as simple as you like. Hence, it is an excellent way of enhancing your creativity while saving on some costs.
So, how do you make a portable DIY ring toss game?
Materials
Below are the materials you’ll use in finishing the DIY ring toss carnival game.
- inch Birch Plywood ( it may be furniture grade A or grade B, commonly 3/4 in. x 4 ft. x 8 ft)
- inch Birch Plywood( it may be furniture grade A or grade B, commonly 1/2 in. x 2 ft. x 4 ft)
- Select Pine( 2 in. x 2 in. x 6 ft, 2 pieces)
- An optional ¼ in. dowel
- Dowel ( 4 ft. x 1/2 in. 4 pieces)
- 18 gauge brad nails
- 1 bottle of wood glue
- 220 grit sandpaper sheets
- 220 grit sandpaper discs (optional)
- Clear spray paint, 1 can
- Multipurpose adhesive, 1 can
- Orange, blue, red, green ( your color choice) water-based dye, 1 pint.
- Graphic(optional)
- Box hinges
Tools
What are the tools to use when creating the game? To ensure you have everything you need, below are the main tools, including some optional ones that you’ll need to make a ring toss game.
- Table Saw
- Miter saw
- Jigsaw
- Drill kit
- Drill press
- Fluted drill bit
- 24-inch quick grip clamps (4 units)
- 40-inch parallel clamps (4 units)
- Hammer or nail gun kit
- Dowel jig kit
- Air compressor(optional)
- Japanese saw(optional)
- Orbital sander (optional)
Construction
1. Cut both the plywood into pieces required to make the box for the ring toss game using a table saw. You could use any other strong saw if you don’t have a table saw.
2. After cutting the pieces using the table saw, look for the edges that require additional attention and sanding. This makes them smooth and fitting when glue or nails are applied.
3. To ensure that you got the dimensions right, dry-fit all the pieces you cut for the box in step 1. If some parts appear rough or incompatible, you can try filing or sanding some parts off.
4. Cut the handles on each side to ensure you can safely carry the box into the playing area.
5. Glue all the pieces and then fit them together using wood glue. Besides using glue, you can also use nails or screws.
6. Use the 24-inch quick grip clamps to hold or fasten the pieces to ensure they hold firmly. This will help them be compact and dry as a unit.
7. If you used glue, let it dry for 24 hours before removing the clamps, and this ensures that the glue is dry and bonds the structure ring toss box intact.
8. Fix multi-level y-shaped pins to hold the dowels.
9. Next, stain your pegs in colors that support the theme for the party. It may be red, green, pink, blue, whatever color you love. The number of pegs might vary depending on the size of your box.
10. Use a Miter saw to cut the basis where the peg will be fitted onto. You can stack them together to make a perfect or precise cut.
11. Using a drill kit, drive the drill bit into the wooden bases to drill the holes for fitting the pegs. The holes should be equally spaced based on the size of the box and your rings.
12. Stain your box and bases with a water-based dye that matches your party’s theme. If you are making the box for routine home uses, why not match the dye with the colors of your home to ensure uniformity?
13. Use clear spray paint to give the box a clear coat and protect it from marks and scuffs.
14. If you had a graphic to make the Ring toss game box more appealing, this is the time to apply it. The graphic may contain instructions on what the winner gets, rules, or a drawing that is inspiring.
15. Attach or fix the door to the box using box hinges that you can easily get in your local furniture store.
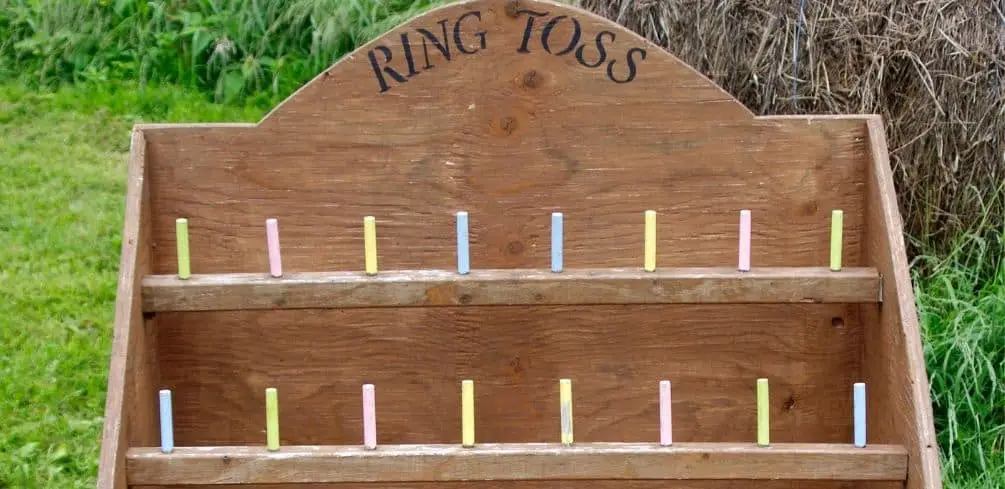
16. Fit the pegs into the holes drilled on the rails/ bases. This will let you know if all the pegs fit or some don’t. Although the box houses the pegs and rails when not in use, it is also a part of the game, making this design impressive. The pegs should fit in alternating colors.
17. Install the rail/base with the pegs onto they-shaped pins for a perfect fit. Since you had cut all the rails precisely, they n will properly fit into the box. To close the box, remove the pegs and store them within the box. When preparing to play, attach the pegs on the rails and proceed with playing.
18. Next, find a source for rings from your nearby shop, and you can also use wires to make them yourself.
19. Now is the time for the big reveal. You have a complete DIY Ring Toss Carnival Game; it is time to invite your kids or family for a test run. If everything works fine, it’s time to have fun.
Safety Precautions
1. Ensure you wear safety gloves and safety goggles to prevent the sawdust from entering your eyes
2. Take precautions when working with saws, nailgun, hammers, or drill kits because they might injure you.
3. Ensure that all the electrical connections are properly insulated before you begin working on this project.
4. Spray the box in an open place to prevent the smell of the dye doesn’t suffocate you.
Summary
You can have a lot of fun playing the ring toss carnival game. Whether young or an adult, the game doesn’t choose gender or age, and it works perfectly well for anybody.
Ring toss Carnival game ensures you are attentive and have good hand-eye coordination while also keeping your mind sharp. The design described above ensures safety since everything is stored in the box, meaning the kids cannot triple onto or be hurt by the pieces.
Now that you know how to make a DIY ring toss carnival game, why not try it? Let your family have fun while enhancing your creativity. Looking for more try our DIY Mini Bowling Alley for the backyard.
Please be careful and use at your own risk
None of the authors, contributors, administrators, or anyone else connected with BestPlaygroundSets, in any way whatsoever, can be responsible for your use of the information contained in or linked from these web pages.


