Just as summer nights call for outdoor gatherings, they’re also perfect for backyard movie screenings. You’ve probably considered hosting one yourself but weren’t sure where to start. Creating your own outdoor movie screen doesn’t require expensive equipment or professional skills—just a few materials and some creativity. With these seven DIY tips, you’ll transform your yard into a neighborhood cinema that’ll impress friends and family while keeping your budget intact. Ready to build your first screen?
Choosing the Right Sheet Material for Your DIY Screen
The foundation of any great outdoor movie screen lies in selecting the perfect sheet material.
You’ll want to choose between blackout cloth, white vinyl, or specialized projection screen fabric. Blackout cloth offers excellent value—it’s affordable at $20-40 per sheet and provides good image quality without light bleeding through.
For better results, consider white vinyl shower curtain liners which deliver sharper contrast. They’re weather-resistant and easy to clean with a simple wipe-down.
If you’re willing to invest more, specialized projection fabrics ($50-150) offer professional-quality imagery with enhanced brightness and reduced wrinkles. Creative outdoor seating can also enhance the overall movie experience by providing comfortable areas for guests to relax before and after the show.
Whatever you choose, make certain it’s wrinkle-free when mounted.
Test your material in daylight to check for imperfections that might show during projection.
Crafting a PVC Frame for Easy Setup and Teardown
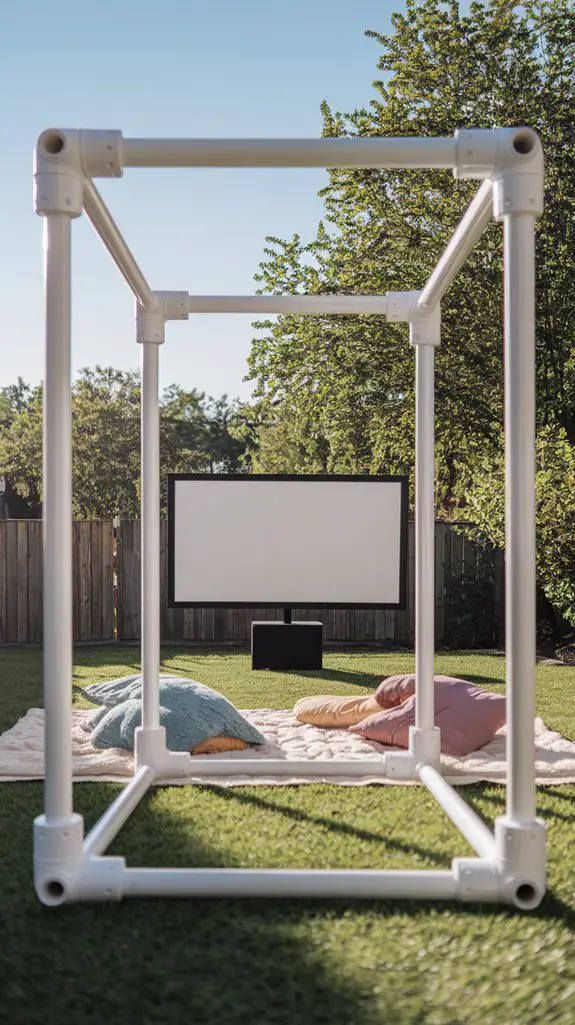
While your sheet material forms the viewing surface, a sturdy yet portable PVC frame will become the backbone of your outdoor cinema setup.
You’ll need 1½-inch PVC pipes, four 90-degree elbows, and four T-connectors to create a rectangular structure.
First, measure and cut the pipes according to your desired screen dimensions—typically 8 feet wide by 4.5 feet tall works well for most home projectors.
Connect the horizontal and vertical pieces using the elbows at corners and T-connectors where you’ll add support legs.
Don’t forget to sand down any rough pipe edges that might tear your screen.
For extra stability, fill the base pipes with sand or attach guy wires to ground stakes when it’s windy. Cozy seating arrangements are essential for enhancing the overall movie-watching experience.
The beauty of PVC is that you can disassemble it completely for compact storage until your next movie night.
Weather-Resistant Screen Options for Unpredictable Conditions
Since outdoor movie nights can face sudden weather changes, choosing the right screen material becomes essential for year-round enjoyment.
Consider blackout cloth treated with waterproof spray for an affordable option that resists light moisture and won’t stretch when damp.
For superior weather protection, invest in specialized outdoor projection fabric. These materials repel water, resist UV damage, and dry quickly after rain.
Carl’s FlexiWhite and Elite Screens’ CineWhite are excellent commercial choices.
Another durable option is marine-grade vinyl—the material used for boat covers. It’s naturally waterproof and mildew-resistant, making it perfect for humid climates.
Always secure your screen material with grommets at the edges to prevent tearing in windy conditions.
After use, store your screen in a dry place or use a protective cover to extend its lifespan. Additionally, consider incorporating eco-friendly backyard furniture to enhance your outdoor setup and promote sustainable living.
Creating a Permanent Backyard Theater Installation
For homeowners ready to elevate their outdoor entertainment experience, installing a permanent backyard theater offers convenience and durability that temporary setups can’t match.
Start by selecting a sheltered location with minimal ambient light and plan your screen placement facing away from the setting sun.
Build a sturdy frame using weather-treated lumber or PVC piping that’s anchored securely into the ground.
You’ll need:
- Concrete footings to prevent wind damage and guarantee stability
- A retractable screen system that allows you to protect your screen when not in use
- Weatherproof housing for your projector and audio equipment
Consider installing dedicated outdoor electrical outlets to eliminate hazardous extension cords.
Add pathway lighting for safety, and incorporate comfortable, fixed seating for the ultimate backyard cinema experience. Additionally, a well-designed outdoor theater can significantly enhance your home’s outdoor entertainment experience.
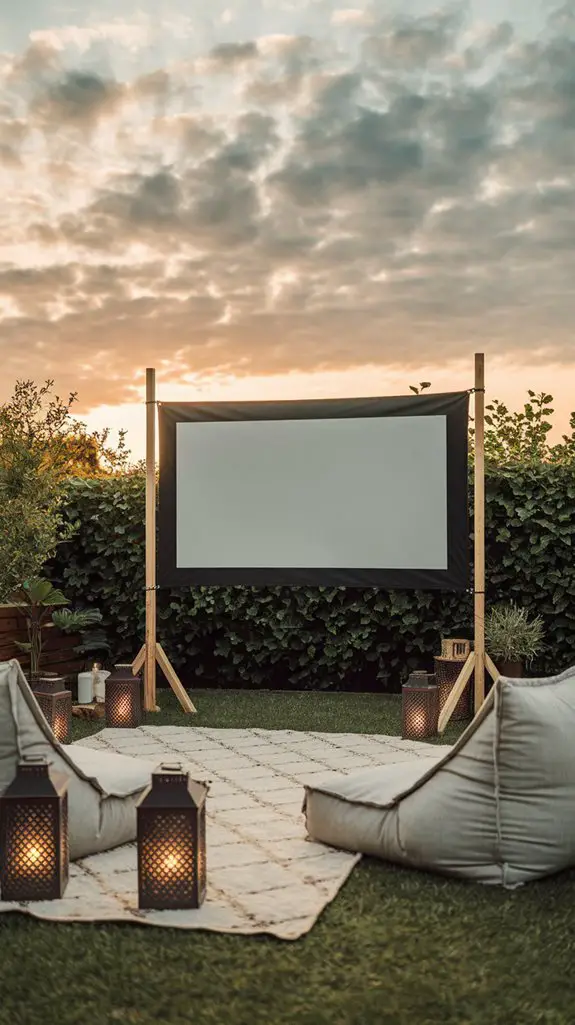
Budget-Friendly Screen Solutions Under $50
Creating an impressive outdoor movie screen doesn’t require emptying your wallet. With just a few affordable materials, you’ll be hosting movie nights in no time.
The simplest option? Use a white bedsheet. Secure it tightly between trees or on your fence with bungee cords for a wrinkle-free surface.
For better durability, invest in painter’s drop cloth ($15-20) – it’s thicker and more resistant to weather.
Another great solution is blackout cloth from fabric stores ($25-30), which prevents light from passing through, creating better contrast for your movies.
For a sturdier DIY screen, attach PVC pipes ($20-25 for materials) in a frame shape and stretch white blackout fabric across it.
Secure with zip ties for easy assembly and storage. Additionally, make sure to set up your screen in a comfortable seating arrangement to enhance the overall movie night experience.
Optimal Placement and Securing Methods for Windy Evenings
When the evening breeze picks up, your outdoor movie experience can quickly turn frustrating if your screen starts flapping or toppling over.
Choose locations that offer natural windbreaks like walls, hedges, or fences to shield your setup.
To keep your screen steady in windy conditions:
- Use sandbags or water weights at the base of your frame—simply fill gallon jugs halfway with water and attach them to each corner.
- Install tent stakes and guy lines for added stability—drive stakes at 45-degree angles away from your screen.
- Apply bungee cords in a criss-cross pattern behind the screen to prevent billowing while maintaining tension.
Position your screen perpendicular to prevailing winds when possible, and always check weather forecasts before setup. Additionally, having the right outdoor movie night essentials can greatly enhance your viewing experience.
A well-secured screen means you’ll enjoy your movie without distracting adjustments mid-film.
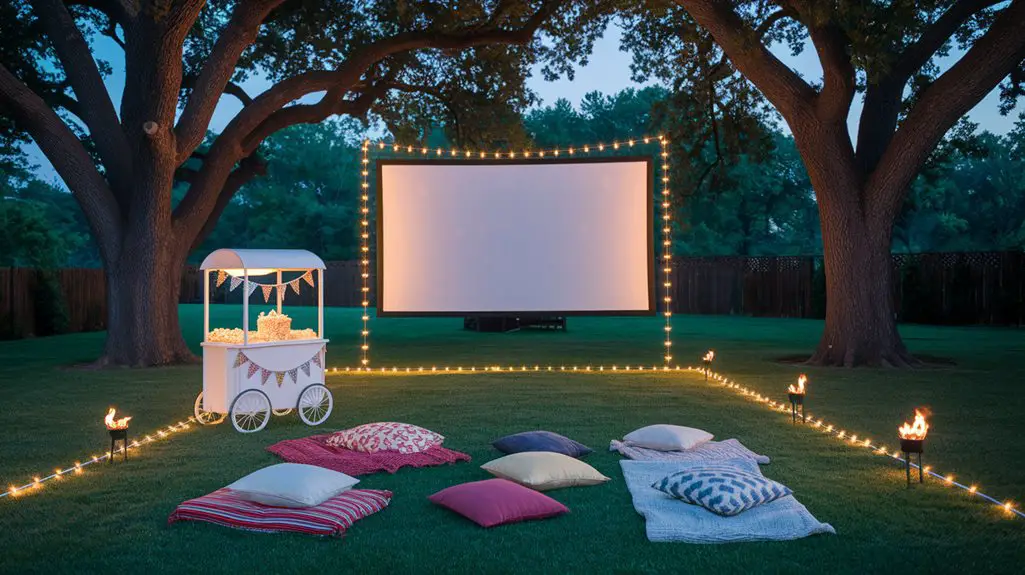
Enhancing Your Screen With Ambient Lighting and Decorations
The right ambient lighting transforms your outdoor movie area into a magical retreat while ensuring guests can safely navigate the space without washing out your screen. Position string lights behind seating areas or along pathways, avoiding direct light on the screen. Try wrapping fairy lights around tree trunks or stringing them overhead for a starry effect.
| Decoration Type | Best Placement | Effect |
|---|---|---|
| Solar pathway lights | Along walkways | Safe navigation |
| String lights | Behind viewers | Cozy ambiance |
| Lanterns | On tables | Warm glow |
Add weather-resistant pillows and throws for comfort. Hang movie-themed bunting or posters nearby to create atmosphere. Consider potted plants with soft uplighting to define your outdoor theater space without creating distracting shadows on your screen. To elevate your gathering, incorporate outdoor movie setups that enhance the overall experience.
Conclusion
You’ve now mastered the art of outdoor cinema—congratulations on becoming the neighborhood’s Steven Spielberg with a sheet and some PVC! Don’t be surprised when friends suddenly remember your existence on warm summer nights. Just remember, while your DIY screen might wobble in the wind like your aunt after too many mimosas, you’ll still feel smugly superior to those paying $15 for stale popcorn at the multiplex. Happy screening!


